Email

For business inquiries email: cherienailart@gmail.com

Monday, August 1, 2011

Fun Flower Nail Art Tutorial

So I did this nail art late at night and decided to do a tutorial for it. The nail art itself is very simple, you just need the right tools. I did this on short nails so it would be great for any any length nails.

First off you want to have buffed and filed your nails.


Next you want to add a base coat to keep the nail polish from staining your nails. I bought this one from Walmart.


Next you want to add your base color. Here I am using OPI's mermaid's tears from the pirates collection.


Next you want to take a dotting tool, which you can find at Sally's or Ebay, or a tooth pick and make small dots on opposite corners of your nails with a white polish. Just take a piece of paper and place a few drops of polish on it, then dip the dotting tool in the little puddle you made.


Now you want to take 5-6 different colored nail polishes and use the dotting tool to make five dots around the white dots you just made.


Now the next step is a little trickier. You want to take a tooth pick and drag it in the middle of the colored dots about 30 seconds after you place the dots. Timing is key b/c if the dots are too wet then the line wont show up as well. You want to wait for the dots to become a bit tacky. This gives the flowers some texture so they look more realistic but you don't have to do this step.


The next step is to take a small fine brush, this one I got at Sally's, and paint two green lines for stems.


The next step is to simply place a white dot in the center with five colored dots around it. I put a clear rhinestone in the center. You can buy gems from Sally's or Ebay (ebay is way cheaper).


*Tip: When placing gems you want to apply some top coat to whatever area you are placing the gem in order for it to stick. Then when it dries, apply top coat to entire nail for maximum adhesion.

Now I decided to paint small leaves on each of the flowers with the fine brush but you don't have to. I also added gems to both my pointer fingers.


These are the finished results. Add top coat when the entire nail is dry or you run the risk of smudging the flowers.


Hope you enjoyed :)

Wednesday, July 13, 2011

Review of Tokiodki Sodashop Palette

Tokiodki is one of the cutest brands to come to sephora. All of their products are high quality but they don't sacrifice the kawaii :)The brand is of course Japanese inspired (although not a Japanese brand). I was so happy to get my hands on this palette especially since it was on sale for $35 at Sephora (origin. $49).

The palette comes in a hard tin with cute anime characters all over it. You can remove the eyeshadows, which are housed in a cardboard and use the tin for whatever you want.


There is a magnet that comes on top of the palette with the Tokidoki label. The palette also comes with a sheet of different magnets you can put on top of the tin or wherever you like (the tin is magnetized).


The palette also comes with 12 eyeshadows, an eyeliner pen, and a nail file.


The eyeshadows alone are much bigger than a MAC eyeshadow, which at $14.50 a pop is half the price of the Tokidoki palette.

Here are some swatches:


Here is a swatch of the eyeliner:


As well as a look I did with some of the eyeshadows and the eyeliner:


Overall I rate this palette a 4.5/5. I take off some points because the matte eyeshadows are a little more difficult to work with, but honestly this is true for most brands. There is a nice mix of matte, shimmer, satin, and glitter finishes of the eyeshadows. The assortment is also very nice with eyeshadows ranging from very neutral to very bright. All of the eyeshadows are very pigmented except for the frosty white color that takes a little work getting it to be very pigmented. There is some fall out with these shadows, the texture is a little powdery but you just need to be a little more careful and tap on the eyeshadow instead of sweeping.

This palette would be great for anyone, from beginners to the very experienced.

The eyeliner has to be my favorite part of the palette. Super pigmented and bright as well as being very easy to use.

The nail file is also a nice touch <3

Saturday, July 2, 2011

My review of Too Faced Romantic Eye Palette

First off i want to say that I am a Too Faced super fan! When I first started getting into makeup Too Faced was the first brand that I fell in love with, and after many years the brand has only gotten better with time.

Anyways, I already have the natural eye palette which is amazing so I decided it was time to give this one a try.

The packaging is super cute and less bulky than previously similar palettes as it does not have a hidden drawer. The price is $36, and if you are wondering why this is a dollar more than the older palettes it's because there is a very small increase in the weight of the shadows.

Here are a few pictures of the palette:


I found the pigmentation to be slightly less than the natural eye palette but still really decent. The lighter shades on the left side are meant for subtle highlighting but you can definitely build the color up.

Here are some swatches:

Natural Light


Artificial Light


The colors are gorgeous and would be great for doing a smokey eye. My favorite color is the dirty goldish eyeshadow.

The bottom line is that I love this palette and it has a nice variety of colors for going out. I do still slightly prefer the natural eye palette for it's pigmentation and wearable everyday colors, but this palette is a nice change of pace.

You can buy this palette at Sephora and Ulta.

Sunday, June 12, 2011

My Makeup Collection/Storage

*Just as a small warning. I have more makeup than the average sane person, but this doesn't mean I have a ton like some makeup gurus on youtube than have dedicated rooms to makeup.

So this is going to be how I store my makeup. I have these plastic drawers that I got from Target that house all my makeup.


Each drawer holds different types, like my foundation and powders drawer:


My lipstick, lipgloss, lipliner, and other lip products drawer:


My bronzer, blush, and Misc. drawer:


My eyeliner, mascara, and primer drawer:


My palette drawer (There's some on top of each other):


And Lastly my single eyeshadow and pigment drawer:


Of course my collection grows every month so maybe I'll do an update blog eventually ;)

Friday, June 10, 2011

Color Correcting Dark Under Eye Circles

As I briefly discussed in a previous blog, you can use color theory to correct any issues you have on your face. As green neutralizes red (green concealer on top of red blemishes), so does orange or salmon neutralize blue and dark purple.

Here's an image for reference:


The color directly across is the complementary color, and adding it will neutralize it.

Okay so lets try this with under eye circles.

I will be using a NYX pot concealer from my previous haul blog. These concealers are heavy duty and a little thicker than your average concealer. Since it is a little thicker I'm going to use a concealer brush instead of a blending brush.

Here is my eye area that I have just primed with my garnier eye roller.


As you can see I the area is dark.

Now I am going to take my orange concealer with a brush and place it on my under eye area.


You're going to want to blend this out with your finger. Now I know this looks kind of scary but the purpose of doing this step is to neutralize the dark circles before placing regular concealer.

Now taking a regular concealer that is near my skin color I am dabbing this on top of what I just did.


This is the nearly finished product. As you can see the under eye area has been transformed dramatically. Of course you still want to blend a little of your foundation on top of this so it blends seamlessly onto the rest of your face like this:


All of this steps are optional but if you are going somewhere special, or are going to be photographed I suggest giving this method a try. NYX is a really inexpensive option but Bobbi Brown also has an awesome salmon colored concealer if you can afford a more expensive option that isn't as orange tinted.

Saturday, June 4, 2011

MAC Surf, Baby! Collection

MAC always comes out with a big summer collection and they did not disappoint this time with Surf Baby. There are many products that came out with this collection including 4 lip sticks and lip glasses, as well as 5 eyeshadows, two eyeliners, 2 crushed metallic eyeshadow stacks, and much more.

I bought a few things that I thought really stood out.


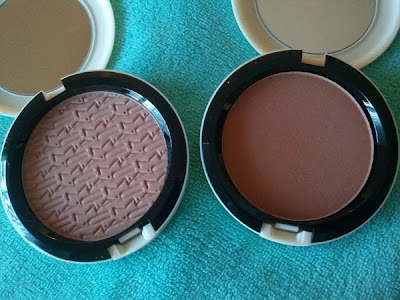
Left: Surf, Baby! Studio Careblend/Pressed Powder in Lush-Light Bronze US $28.00
Right: Surf, Baby! Bronzing Powder in Solar Riche US $24.00


Surf, Baby! Lipstick in Hibiscus (Cremesheen) US $15.50


(Left to Right) Hibiscus, Solar Riche, Lush-Light Bronze.


The Studio Careblend/Pressed Powder is a product that MAC has brought out before in past collections. The formula of the powder is very soft and almost airy, and blends beautifully onto the skin. There was another color that was much lighter that would look great on ivory complexions. The price is quite expensive ($28) but this is my favorite product out of the whole collection. This goes without saying but it is great for contouring the cheeks since it is a matte finish. Lush Light Bronze is described as a mid tone rosy pink brown.

The other bronzer I got, Solar Riche which MAC describes as a midtone deep orange brown, is also very nice and is mostly matte with a tiny bit of shimmer that goes largely unnoticed on the face.

Lastly the lipstick is the perfect coral red which is about medium opacity and is very easy to wear. This would be great for women who are hesitant to wear bright red since Hibiscus is a more subdued option. Hibiscus is described as bright orange coral.

Thursday, June 2, 2011

NYX Sale Haul


I was so excited to take part in the NYX sale a few weeks ago, and I got some really amazing products.

I'll start off by talking about the concealors:


They are a really creamy consistency that can be very easily blended, with medium to buildable coverage. The orange is meant to color correct under eye circles (I'll post another blog about this soon).


These are called crystal glitter liners and are fantastic. You can pack on a lot of glitter with these.


This one is in the color teal, but I think it looks more of a minty green. Another product I really liked as it was so unusual.


This lip gloss is in the color vanity, and is the perfect sheer coral color. Non-sticky and very glossy.


Lastly is the HD primer, which is nude tinted and works very well. I actually like it more than my too faced shadow insurrance that is way more expensive.

Makeup of the Day

I was inspired by pirates of the caribbean today, so I did a mermaid kind of look :)

Here are some pictures:
(Lol I look so serious in this picture)

It's really all about blending. I used a blue pigment and some green shadow, and kiwi rose pigment by Jesse's Girl in the inner conner to really make the eyes pop. I also put some NYX jade glitter liner on the bottom, as well as NYX teal eyeliner.