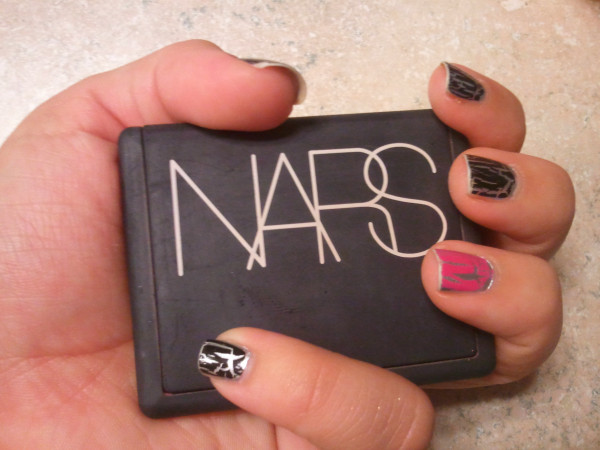
I think blush is one of the essential makeup products that most women use. There are so many out in the market that it can be hard to choose. I don't think that you necessarily need to buy expensive blushes because there are so many drugstore brands that offer good quality blush.
Here's a list of my top 5 favorite blushes:
1-At number one is NARS Orgasm blush. NARS is known for picking controversial names for their blushes and of course this blush is their number one best seller. They also made a another called super orgasm which is just more glittery (definitely cannot recommend the super). There is shimmer in this blush but I think it adds a nice sheen. NARS is a very expensive brand, at $27 a pop for blush. Honestly they get away with charging so much because they are really good at making blushes and are recognized for this specialization. The pigmentation is about a medium, but very build-able. The orgasm shade is said to be universally flattering to any skin type.The packaging for NARS is also very sleek, the only negative is that the matte finish can get a little dirty looking.
2-My second favorite is Physician's Formula Happy Booster™ Glow & Mood Boosting Blush in Natural. It is marketed to enhance your mood. It don't know how much happier I am because of the blush, but the packaging and design does bring a smile to my face! The blush also has a light flowery smell to it, which is also nice. This blush is very pigmented and comes with a nice little brush in a hidden compartment. This one retails for about $12.
3-Next is a product that came out from Hard Candy, which is sold exclusively at Walmart. It's called Fox in a Box in truth or dare, a blush and bronzer duo. You are supposed to swirl the two colors together, but I prefer to use them separately. The pink shade goes well with my lighter complexion. Sold for $6.
4-Clinique's Blushing Blush Powder Blush in Aglow. I've had this product for a really long time and I still love it. It's the perfect mix between a bronzer and a blush. Sold for $20.
5-Last but not least I'm including Stila's convertible color in peony. This product is awesome because it is multi-functional. It works as a cream blush as well as a lip product. You want to dab a little bit on with your fingers and blend it in to your skin. It lasts longer if you set it with a light application of blush. The one shown in the picture is a sample (I've had it for over a year and still have a lot left), but the full size is $25.
For business inquiries email: cherienailart@gmail.com
Wednesday, May 25, 2011
Sunday, May 22, 2011
China Glaze Crackle Nail Polish
I have been checking my local Sally's every week to get the China Glaze Crackle nail polish. Apparently they sold out of it in the first week they had it in stock. Finally I got my hands on three of them and here are the swatches:
The trick with these polishes is to apply thin coats. When you do thick coats there isn't as much cracking in end result. Also, the base nail polish needs to be completely dry before you put on the crackle.
OPI and Sally Hansen also sell crackle nail polish but they are much more expensive, so if you can get China Glaze I would get that instead.
Here is a video I made showing a demonstration of the nail polishes:
Thursday, May 19, 2011
Jesse's Girl Cosmetics
Recently I went to Georgia and I was really excited because in Georgia they have Rite Aids there (since the state I live in has no Rite Aids). The only place they sell Jessie's Girl makeup is in Rite Aid, so I took the opportunity and bought a few pigments.
Here are the swatches:
Colors (from left to right)
-Peek-A-Boo (Violet/Pink)
-Penny Arcade (Copper Sparkle)
-Cafe Au Laite (Rose Gold)
-Pixie Dust (Gold Sparkle)
-Kiwi Rose (Green Sparkle)
For any pigment I suggest you prime your eye with L.A. Splash eyeshadow base, as it is very sticky and will hold on to the the pigment better than anything else. Also, try to put on your foundation and powder after the eye makeup so it is easier to clean up the fallout from the pigments.
Overall, I really liked these pigments especially because they have many duo chromes available, which are my favorite because they flash different colors in the light.
The pigments retail for about $5 depending on were you get them.
Tuesday, May 17, 2011
MAC Fashion Flower Collection
The Fashion Flower collection came out a few weeks ago and includes 6 eye shadows (imprinted with a daisy design), four lipsticks, 3 lip gelees, and two beauty powders.
I picked up two of the eyeshadows.
Lucy Green and Fresh Daisy
Here are the swatches:
Overall I really liked the eye shadows I picked, however they are not especially original. The pigmentation is great and the daisy design is really cute. The design does not go through the whole pan but should stay on for a good while.
Here is a look I did using the shadows, however the picture kind of washes out the colors.
Monday, April 18, 2011
Easter Nails
Originally I had planned to do these nails as tutorials, but there was just too much to take pics of so it didn't pan out :(
Well you can still enjoy the pics :o)
Saturday, April 16, 2011
Look Using Glamour Doll Eyes Pigments
Here's the look:
I used:
*I suggest you do your eye makeup first before you do your face as pigments can get messy.
First I put Jealousy all over the lid (I wet the brush very slightly to create a more intense effect).
Then I used cloud coverage on the inner corner.
Next I used Graffiti in the crease/outer V area. You need just the smallest bit, and remember to blend blend blend!
Lastly I used Sterling Glitz on top on the Cloud Coverage (again I wet the brush a little bit). Finish with a winged liquid liner
*I also tapped a little bit of Chocoholic on top of a green eyeliner on the bottom lash line
When I was done I used a makeup cloth to clean up the fallout and create a nice straight edge on the sides of my eyes.
All the pigments are at:
glamourdolleyes.com/
My review of their pigments including swatches:
Even more amazing brushes for cheap :) (Real Techniques)
Powder Brush
$9.99
Foundation Brush
$7.99
Stippling Brush
$9.99
Sold at Ulta Stores
Enjoy :)
Saturday, April 9, 2011
Spring Flower Nails!
So I took this nail art idea from an amazing nail blogger (The Daily Nail) and here is the original:
http://daily-nail.blogspot.com/2011/04/funky-floral.html
I added some extra details but it's basically the same thing. Here's how I did it, it's really not hard at all.
What you need:
The nail polish I used is:
Spontaneous by China Glaze (purple)
Peachy Keen by China Glaze (peach)
White on White by China Glaze (white)
Teal the Cows Come Home by OPI (blue)
Fiercely Fiona by OPI (greenish yellow)
Black on Black by Sinful Colors (black) *not pictured above
Pro Fx Epoxy Bond Base Coat
You will also need two thin brushes (you can use painting brushes), a tooth pick, and some acetone. You need the acetone to clean the brushes in between uses. Also it's a good idea to wait for your coats to dry before you start decorating.
*Optional: wood stick to clean up any nail polish that gets on your cuticles.
First apply a base coat to protect your nails from staining, and allow to dry.
Next paint nails a shimmery blue color (or any color of your choice) and allow to dry.
Dab some nail polish on a sheet of paper. Then take a small thin brush and paint different colored little circles randomly throughout the nail. It doesn't have to be perfect.
Next take a thin brush with a slightly longer tip and draw flower petals. Again this doesn't have to be perfect.
Next take a black polish and a tooth pick make little dots in the middle of the flowers.
Now you can be done there, but I wanted to add a little depth, so I added lines on the petals using polishes that were slightly softer than the other colors.
Allow to dry before putting on top coat and you're done :)
Friday, April 8, 2011
How to help hide Blemishes with makeup :)
So we all have blemishes every once in a awhile but we don't have to brave the world with embarrassing redness. Here are some tips to help you out.
First off I want to preface this by saying that there is no way to take away the bump you have on your face. However, you can mask the unsightly redness that comes along with a zit. What you will need it:
Green concealer
Regular concealer
A fluffy blending brush
If you know anything about color theory, you know that red and green neutralize each other, so it would make sense to use a green concealer to counteract the red in a blemish. Nowadays many brands sell them but I can recommend the variety of Physicians Formula ones that are sold in drugstores. Look around online, there are more out there than you think.
*Graftobian also sells amazing concealer wheels
So after you dab some green concealer on, you want to use a concealer or liquid foundation that is your skin tone. The green gives you a clean slate to work with so you can apply your regular stuff without having to worry about the redness. I HIGHLY recommend using a blending brush for this. This brush applies concealer flawlessly, so swirl it around in circles with some product on your blemishes.
There you go :)
Sunday, April 3, 2011
Girly Girl Tutorial
I did this look for a contest entry on YouTube. I thought it was pretty so I did a slideshow showing most of the steps. Please excuse the bad pictures and awkward angles :)
Subscribe to:
Posts (Atom)